Wednesday, February 26, 2014

Homemade Vinaigrette

Knowing how to make a simple vinaigrette may not seem like a coveted skill in the kitchen, but once you understand the base of making a dressing the possibilities are truly endless. I absolutely never buy a bottle of salad dressing, and I mean never. Not only is it an expense that I like to avoid on my ever growing food bill, but so many of them turn a healthy salad into junk. Rather than buying a bottle of salad dressing on your next trip to the market, stroll down the oil and vinegar aisle and buy the bases for making just about any salad dressing you can think of.

I love getting creative with salad dressings and I usually use to seasons as my inspiration. In the fall for example, I love making an apple vinaigrette with some oil, sugar, and apple cider vinegar as my base. The most important thing to remember when making a vinaigrette is the base ratio for oil to vinegar.

3 parts Oil - to 1 part vinegar

Use that ratio as your guide and adjust it to your preference. If you prefer a vinaigrette with a bit more bite to it, use a bit more vinegar or go the opposite direction of you prefer less of a vinegary bite. The types of oil and vinegars you use are also very much up to you as you'll find there are so many to choose from.

My last tip to making a great vinaigrette at home is adding a touch of Dijon mustard. The mustard will emulsify the oil and vinegar together so that they don't separate. Keeping the basics in mind, you can create countless salad dressings based of the flavors you enjoy. Here is a quick example of a basic dressing I use quite frequently.

Shallot Balsamic Dressing
1/2 cup extra virgin olive oil
2 tablespoons of balsamic vinegar
1 shallot finely diced
1 tablespoon of Dijon Mustard
Kosher salt and fresh Black pepper to taste

Monday, February 24, 2014

Bonne Maman Fruits Preserves and Jellies

Bonne Maman fruit preserves, jellies, and jams are one of the staple ingredients my pantry will never be without. Imported from France and using a 100 year old recipe, they are some of the best preserves I've ever tasted. With flavors ranging from common favorites like strawberry and raspberry all the way to cherry, peach, and red currant; you'll be sure to find a flavor to your liking. It's no surprise, when cooking you want to find the best quality ingredients you can to get the best results possible. Make no mistake, Bonne Maman is clearly committed to excellence and they have a passion for their products.

Bonne Maman jellies are perfect for baking but also transform an every day slice of toast of English muffin into a real treat that's delicious for breakfast on the go. I love to pair one of their flavors with a fresh batch of scones or by stirring a few tablespoon of your favorite flavor into your oatmeal. Priced comparable to other jams on the market and available at most major food retailers, grab a jar during your next shopping trip and taste this wonderful product for yourself.


Friday, February 21, 2014

Coconut and Mango Pancakes

I love a stack of hot and fluffy pancakes for breakfast or brunch on the weekends. This recipe was inspired by a Gordon Ramsay recipe, one of my cooking idols and  massive source for inspiration. The blended coconut in the batter makes these pancakes stand out and it's a nice change up from the ordinary  flap jacks we are all use to. Adding a touch of lime zest and freshly cut mangoes on top help bring both a tropical flare and an awakening freshness to this delicious breakfast.

Recipe yields 6-12 pancakes


1 cup of sweetened flaked coconut
1 cup of flour
1-1/2 teaspoon of Baking Powder
A pinch of Kosher Salt
1 Egg
1/2 teaspoon of vanilla extract
1 cup of Milk
1/4 cup of granulated sugar
1 to 2 Mangoes
Lime Zest (optional)
Butter

In a food processor or a blender, add the coconut and pulse until the shreds of coconut begin to resemble a powder. Add the flour and pulse a few more times to combine. Pour the coconut and flour into a mixing bowl adding the salt and the baking powder.

In a separate bowl, whisk together the egg until it is lightly beaten. Add the sugar, vanilla, and the milk to the egg and mix until combined. Forming a well into the center of the coconut and flour, slowly pour the wet ingredients into the dry and whisk until you have a smooth batter. Allow the batter to rest for 10 minutes. If the pancake batter seems to thick, add a little milk. While the batter rests, peel and slice your mango to serve over top.

Heat a large nonstick skillet over medium heat. To test if your pan is hot enough, sprinkle a few drops of water into the pan. The water droplets should "dance" along the surface of the pan and evaporate after a few seconds.

When ready, place about 2 tablespoons of butter into the pan and swirl around to coat. Pour the pancake mixture into the pan and cook until you can see the edges begin to brown and air pockets rising in the top of the pancake. Flip and cook until cooked through. You can keep the pancakes warm in a low oven until you've cooked all of the batter.

To serve, garnish with sliced mango and lime zest. Add a little pat of butter to each pancake and sprinkle with powdered sugar.


Wednesday, February 19, 2014

Risotto with Leeks and Pancetta

Few things can compete against a plate of perfectly prepared risotto. Risotto is a traditional Italian rice dish using short grain and high starch Arborio rice. Despite popular belief, risotto is not a difficult dish to prepare. It does however require a bit of patience because stirring the simmering stock in little by little is so important. The effort you put into making this meal will be well worth the results.

Serves 4
Prep Time - about 45 minutes

½ tablespoon of Olive Oil
1 tablespoon of butter
½ pound diced pancetta
1 ½ cups of Arborio rice
2 leeks chopped (thoroughly washed)
2 cloves of garlic
4 Fresh thyme sprigs
¾ cup of dry white wine
4 cups of Chicken stock
1 cup of vegetable stock
½ cup of freshly grated Parmesan cheese
Flat leaf Italian Parsley
Kosher Salt and Freshly crack black pepper

In a medium sized sauce pan - add your stock, thyme, and 1 clove of garlic that has been roughly chopped. The added garlic and thyme will add even more flavor to the stock as it simmers. Place the pan over a low heat and bring to a simmer and never to a boil. First step is to wash the leeks. Slice white and the light green part of the leeks and allow them to soak in a large bowl full of cold water.

In a heavy bottom pan like a dutch oven or deep cast iron skillet, heat about a tablespoon of olive oil over medium heat. Dice up the Pancetta and add the the hot oil. Pancetta is an unsmoked Italian bacon and is available in most grocery stores near the deli. Fry the pancetta until it's crispy adding a drizzle more of olive oil to the pan if needed. 

While the pancetta is frying, remove the leeks from the water and dry off an excess water. Once the pancetta is crisp, carefully remove from the pan with a slotted spoon and allow it to drain on a paper towel. set aside and reserve for later.

Add the leeks to the same pot we fried the pancetta in and sweat the leeks until they are just tender. Roughly chop a clove of garlic and stir into the leek cooking for an additional minute. Next, add the rice to the pan and stir to make sure all of the rice is coated. Saute the rice with the leeks and garlic for about 3 minutes stirring almost constantly. Add the white wine to the pot and cook for 2 minutes stirring occasionally.

Next, add 1 ladle full of the simmering stock (avoiding the the thyme sprigs) into the rice and stir in. Simmer the stock into the rice stirring frequently until you can see that most of the liquid has been absorbed. Add another ladle full of the stock into the pan and continue this process until all of the stock has been used. This should take about 25-30 minutes. The rice should will be cooked through but still slightly al dente. Stir in the grated parmesan cheese, about half of the crispy pancetta we reserved, and season to taste with salt and pepper.

To serve plate your risotto and garnish with an additional topping of freshly grated parmesan cheese, a few more pieces of pancetta, and a sprinkle of freshly chopped parsley. Serve hot with crispy Italian bread.


Monday, February 17, 2014

Bangers and Garlic Mash with Onion pan sauce

Bangers and Mash is a traditional British dish that consists of pan fried sausages served over top of creamy mashed potatoes. It's said that the dish received it's name due to the popping noise the casing of the sausages would make and how some of the sausages would burst open when they hit the hot pan. Serving the sausage over a flavorful and generous helping of mashed potatoes is key for me. I flavor my potatoes with chicken stock and garlic to bring extra flavor and excitement to this British pub staple. Quick and easy to prepare, Bangers and Mash is a great last minute dinner for a chilly winters night.


About 2 pounds of Red Skin Potatoes
5 cloves of Garlic
1 pint of heavy cream
6 tablespoons of butter (divided)
Kosher Salt
Freshly ground Black Pepper
2 cups of chicken stock
1 large Onion
1-1/2 pounds of linked Sausage
Fresh Scallions or Parsley

Preheat oven to 350

Rinse of your potatoes in cold water and carefully use a pairing knife or a vegetable peeler to remove any bad spots. You can peel the potatoes if you prefer but I like using red skin potatoes for my mashed because of their deliciously tender skins. Cut the potatoes into evenly sized pieces and place them into a large pot.

Peel and crush the garlic and add to the pot with the potatoes. Pour 1 cup of chicken stock over the potatoes and garlic, season with a generous amount of salt, and add cold water to the pot until the potatoes are covered. Place the pot of potatoes onto your stove top over medium heat and bring to a boil. The potatoes are done when they are fork tender.

Peel and slice the onion into thick slices. In a large skillet, preferably cast iron, heat about 2 tablespoons of olive oil over a medium heat. Saute the onion until it's just beginning to turn golden brown and tender. Add the sausage to the pan and brown on all sides cooking for about 20 minutes. Once cooked, remove from the heat and keep the sausages warm in the oven and leave the onions in the pan.

Drain the potatoes and place them back into the pot and add 4 tablespoons of butter and a pint of heavy cream. I know some of my more health conscious readers cringe at adding both butter and heavy cream. You can use something lighter than heavy cream but for me it's the only way to get really creamy mashed potatoes. Using a hand masher or electric mixer, mash the potatoes until they reach your desired texture. Season to taste with salt and pepper and for freshness add some chopped parsley or scallions.

For a quick onion sauce, pour 1 cup of chicken stock into the hot pan to deglaze and scrap up all the flavor bits on the bottom. Off the heat, whisk the final 2 tablespoons of butter into the pan to create the sauce. Be sure to add the butter off the heat or else the sauce won't come together.

To serve, load a generous helping of mashed potatoes onto your plate. Slice the sausage on an angle and place over top of the mashed potatoes and add a scoop of the onion sauce. Serve hot.


Friday, February 14, 2014

Roasted Red Pepper and Basil Panini

A Panini sandwich is probably my all time favorite lunch. A panini is a sandwich that is grilled on a panini press and usually filled with Italian ingredients such as fresh mozzarella cheese, salami, mortadella, and so on. The popularity of the panini has really grown over the past few years and you'll find them on almost any cafe or bistros lunch board. For this panini I loaded mine up with fresh mozzarella, fresh basil, and roasted red peppers (you can find these in a jar or in the deli in most groceries stores). If you don't have a panini press you can make these in a regular frying pan and just add weight to the top to help press the sandwich down. That being said a panini press is an inexpensive kitchen tool I'd highly recommend purchasing. Melted to perfection in between to slices of perfectly grilled ciabatta bread, this is far and away my favorite panini.

Recipe yields 1 sandwich
4 slices of fresh mozzarella
1 whole roasted red pepper cut into segments
5-6 fresh basil leaves
2 slices of Ciabatta bread
1 clove of garlic
Olive oil

Preheat your grilled or panini press to medium heat.

Peel and slice one clove of garlic in half. Take your slices of ciabatta bread and on the inside of the slices, rub the cut side of the garlic along the bread. This will give our panini  a hint of garlic flavor without that overpowering harshness of raw garlic.

Lay two slices of mozzarella cheese down onto one slice of the bread and then top that with the basil and the roasted red peppers. Add the remaining cheese to the basil and roasted peppers and cap the sandwich off with the final piece of bread. Rub some olive oil on the top and bottom of the panini and transfer to your hot griddle.

Grill the panini until the outside of the bread is crispy and golden and the mozzarella cheese has melted. Slice the panini in half and serve warm.


Wednesday, February 12, 2014

Sunday Roast Chicken with vegetables and bread stuffing

During the colder months of the year, a chicken is all but certain to be roasting in the oven in my house on a Sunday afternoon. It's an unofficial family tradition that was passed down from great grandmother, to my grandma, and off to my mom. Like all good family traditions, they never seem to end and I'll gladly continue roasting a chicken for many Sundays to come. Roasted to perfection over a bed of root vegetables and a savory bread stuffing that is always my favorite part of the meal.

3-4 pound oven roasting chicken 
4 tablespoons of butter
2 medium onions
2 stalks of celery
Fresh Thyme
1 pound of carrots 
Fresh parsley
2 cups of chicken stock
5 cups of fresh bread cubes
1 egg
1/2 teaspoon of poultry seasoning
Kosher salt and fresh black pepper
Teaspoon of paprika 
4 tablespoons of flour

Preheat oven to 400 degrees

Melt 4 tablespoons of butter with a drizzle of olive oil in a small skillet. Once the butter is completely melted, add your chopped onion, celery, and the leaves of 1 sprig of fresh thyme and cook for 5-7 minutes. What we want here is for the onions and celery to become tender but not brown, this is called sweating and differs from sautéing in that we aren't looking to achieve any color. Once the celery and onions are tender, remove from the heat and add to the bowl of fresh bread cubes. Mix together with the egg, poultry seasoning, and begin adding the chicken stock. Add the chicken stock little by little until the stuffing is moist but not mushy and Set aside.

In a large roasting pan - add a sliced onion, carrots, ans fresh thyme sprigs into the center of the pan. Group them together to form a bed that we'll place the chicken on to sit as it roasts in the oven. Pour one cup of chicken stock (and any leftover from the stuffing) and an optional splash of white wine into the pan.

Rinse your chicken in the sink with cold water removing any of the giblets that may be stuffed inside the cavity. Place your chicken onto a cutting board away from anything that could possibly become contaminated. Taking a few paper towels or a kitchen towel, pat the chicken dry and season with salt and pepper. Drizzle the top of the chicken with a touch of olive oil and sprinkle over the paprika. Rub the oil and the seasonings together. Insert our bread stuffing into the cavity of the chicken. Place the chicken into the roasting pan over the bed of vegetables and fresh thyme. Cover tightly with tin foil. The foil will act like a tent trapping the liquid in which will steam the chicken to help the cooking process and to keep the chicken most. Put the chicken into the oven and begin roasting for an hour and a half minutes.


After the hour and a half has gone by, remove the foil and continue roasting the chicken uncovered. Taking the foil off now will help the skin get crispy and golden brown. Roast until the juices run clear when you cut between the leg and the thigh. Chicken should register between 170 to 180 on a meat thermometer. Once done, remove to chicken from the oven and let it rest for about 15 minutes to let the juices of the chicken absorb back into the meat. Place the chicken onto a carving board and remove the stuffing from inside. Place the vegetables from the bottom of the pan in a serving bowl and you'll be left with the pan drippings that we'll use to make our gravy. Place the roasting pan back into the hot oven with the drippings.
Mix the 4 teaspoons of flour with about a cup of very cold water. An old jar or a tuberware container with a lid are perfect for this so you can shake the flour and water together until all the lumps of flour are gone. Whisk the flour mixture into the drippings until it begins to thicken. Leave in the oven to keep warm while you carve the chicken.

Finally our Roast Chicken meal is ready to come together! A side of stuffing, our roasted vegetables, juicy roast chicken, and the gravy to go with. Of course a side of Mashed potatoes never hurt this meal!


Monday, February 10, 2014

Chopping an Onion

Chopping an Onion is one of the most common tasks we do as cooks. Used in almost every kind of cooking throughout the culinary world, A sauteed onion is the base for countless recipes. You might not know this, but there is a proper way to chop an onion so that you never shed a tear and you get consistently even dices every time. If you don't do it this way already, I assure you you'll never go back to any other method once you give it a try.

Step #1 – Get out a clean cutting board and a sharp knife. Cut the onion in half length ways and remove the papery exterior layer.

Step #2 – Slice the top tip of the onion off but make sure you leave the root in tact. The root is at the bottom end of the onion. The root not only helps keep the layers of the onion together as we dice but it’s when you cut through the root that the onion juices begins to bleed and that’s what cause our eyes to tear. There are many old wives tails about how to not tear up when chopping up an onion but this is the sure fire way to prevent it.

Step #3 – Firmly hold the onion and make two to three (Depending on the size of the onion) horizontal slices in the onion stopping just before you make it to the root of the onion.

Step #4 –Now make vertical slices through the onion from the top to the bottom. Again be sure to stop just before the root of the onion. Cutting all the way through at this point will cause the onion to fall apart. If both the horizontal and vertical cuts are done correctly the onion should still be holding together.

Step #5 – Slice the onion now starting from the flat cut side and ending at the root of the onion. Your end result should be a pile of perfectly diced onions ready to be included in your recipe. Trim the onion around the root and discard.


Friday, February 7, 2014

Frittata with fresh Basil and Tomatoes

A Frittata is an Italian egg dish that is very similar to an omelet. The difference is where as you fold an omelet over top of it's self, a Frittata is left open faced and finishes cooking in the oven (so be sure to use a pan with an oven safe handle.) A Frittata is the perfect dish for a weekend breakfast or brunch as it can be served hot or at room temperature and the flavor combinations you can use are seemingly endless. Since a Frittata is a classic Italian dish I like to use ingredients that are predominately in Italian cooking as well. Fresh Basil is my all time favorite herb and it pairs beautifully in this Frittata with cherry heirloom tomatoes and fresh Parmesan. Healthy, satisfying, and delicious - this is the perfect meal to start your day with.

Prep time- 5 minutes
Cook time- 15
Serves 3-4

5 extra large eggs
1/4 cup of half and half
1 tablespoon of extra virgin olive oil
1 tablespoon of Butter
Half pint of Cherry heirloom tomatoes 
6-8 Fresh Basil leaves
Kosher salt and freshly cracked black pepper
Fresh Parmesan cheese

Preheat your oven to 375 degrees.

Crack the eggs into a medium sized mixing bowl and lightly whip them together with the half and half using a wire whisk. Season the eggs with a few cracks of fresh pepper, the sliced fresh basil leaves, and some freshly grated Parmesan cheese. A good buying tip for getting the best eggs is looking for the label that says "cage free". A chicken that is less stressed and not confined will produce better tasting eggs.

Place a medium sized non-stick skillet over medium heat and melt the tablespoon of olive oil and butter together. Slice the tomatoes in half and season with a pinch of kosher salt and pepper. Add the tomatoes to the hot pan and sauté for 2 to 3 minutes.

Once the tomatoes are heated through, pour the egg mixture into the pan. Allow the Frittata to cook on the stove top for 3 to 5 minutes until you see the eggs begin to firm up around the edges of the pan. Turn off the heat, add more Parmesan cheese to the top of the Frittata, and transfer to the oven and bake for 5 to 7 minutes or until the top of the Frittata is no longer runny.

Carefully remove your Frittata from the oven. Lightly tap the bottom of the pan onto a cutting board to help loosen the eggs from the bottom of the pan. Use a spatula or parring knife to gently loosen the eggs from the sides of the pan and the Frittata should easily slide right out and onto a cutting board. Garnish with more shavings of Parmesan cheese if desired, cut the Frittata into slices, and serve.


Wednesday, February 5, 2014

Farfalle with Spinach, Chicken, and Heirloom Tomatoes

I love pasta! Not only is it comfort food for me it's one of the most versatile ingredients to cook with in the kitchen. This was a quick weeknight meal I came up with one evening that has quickly become one of my favorite meals to prepare. Deglazing the pan with some white wine after sauteing the chicken and shallots is the key to a deeply flavored sauce. Adding the heirloom tomatoes, fresh spinach, and aromatic basil towards the end of cooking bring a delightful freshness to this dish.


Serves 4-6
Prep time- About 10 minutes
Cooking Time-25

1-1/2 pounds of Boneless/Skinless Chicken
2 Tablespoons of All purpose flour
Kosher Salt and Freshly cracked black Pepper
1 small Shallot (sliced)
About 2 tablespoons of Extra Virgin olive oil
2 cloves of chopped Garlic
1 cup of Pino Grigio (Or another Dry White Wine)
6oz bag of Fresh Baby Spinach
1 pint of Heirloom Grape Tomatoes (sliced in halves)
Freshly Cut Basil
Parmesan Cheese
1 pound of Dried Farfalle pasta

Fill a large pot about 3/4 full of water, season generously with salt, and add a splash of olive oil. Allow the water to come to a boil then add the Farfalle (FYI ~ Farfalle pasta gets it's name from the Italian word for Butterfly) pasta and cook until al dente.

Meanwhile start by cutting the chicken breast into chunks. Season the chicken with salt and pepper and dredge the chicken with the flour. Add your olive oil to a large skillet and place the pan over a medium high heat. Once the oil has come to temperature, add the shallot to the oil and allow the shallot to sweet for 3 to 5 minutes. Add the chicken to the pan and brown the pieces of chicken on all sides (8 to 10 minutes) adding more olive oil to the pan if needed. Once browned, add the garlic to the chicken and shallots cooking for a minute or two while stirring to make sure the garlic doesn't burn.

Deglaze the pan by pouring in the wine and scrapping the bottom of the pan to help loosen the golden brown bits that have built up on the bottom. CookAt this stage your pasta should be ready to be drained. Drain the farfalle but conserve a bit of the starchy pasta water. Add the pasta and the the extra water we saved right into the skillet.


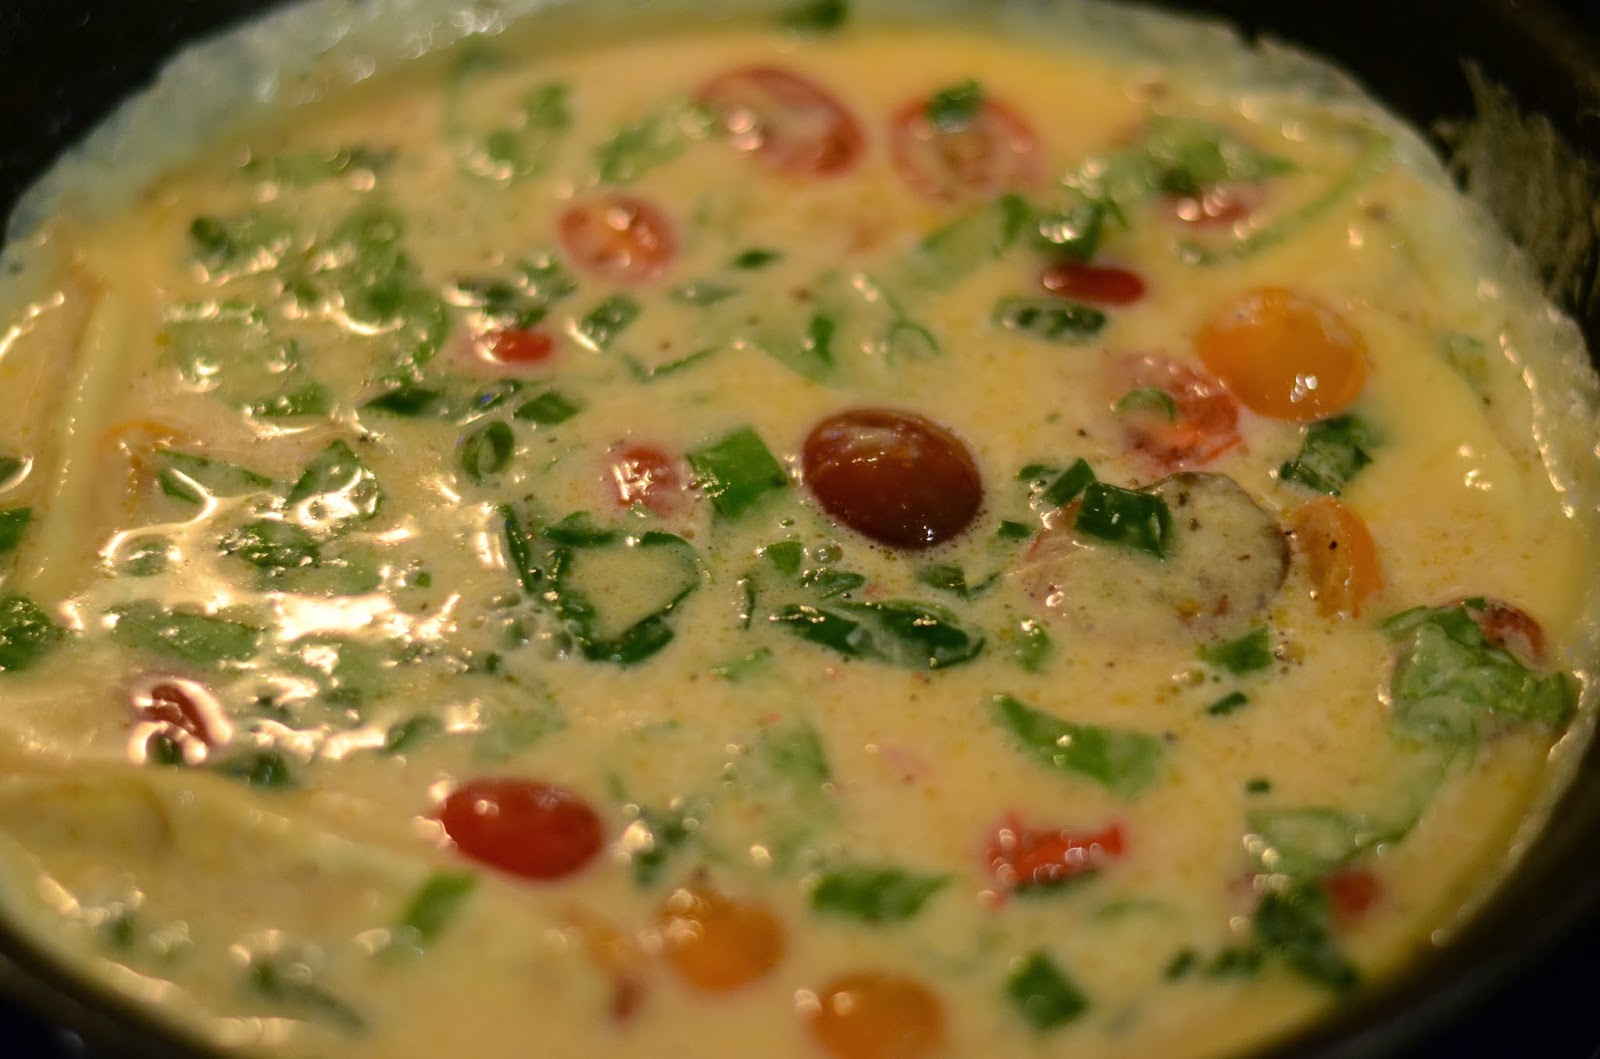
Add the fresh spinach and the tomatoes into the skillet and gently toss everything together. It will look like a lot of spinach at first but the spinach will cook down to almost nothing in a very short amount of time. Allow the pasta and the vegetables to sit in the hot skillet with the chicken and wine sauce for a few minutes to help the flavors settle. Season with salt and pepper.

Lastly, sprinkle the entire pan with some freshly cut basil leaves and freshly grated parmesan cheese. Some toasted Pine Nuts are also a great final additive to this pasta dish if you have them on hand. To serve, garnish with an extra topping of parmesan, a crispy piece of Italian bread, and a glass of chilled Pino Grigo.


Sunday, February 2, 2014

Welcome to my Kitchen

After taking a few weeks off from blogging, I've returned from my hiatus with a brand new blog. While I enjoyed pairing recipes with some of my favorite movies with my blog Food For Flicks, I've now set my attention more towards the cooking aspect. Here I'll be sharing with you recipes, cooking tips and tricks, and techniques to make your time in the kitchen easy and enjoyable. Hope you all enjoy my new endeavor and become excited about cooking food at home for your family and friends.